How to Install Bidet Seat Attachment
Learn how to easily install your bidet seat attachment with our step-by-step guide. This page provides clear instructions, helpful tips, and troubleshooting advice for DIY installation.
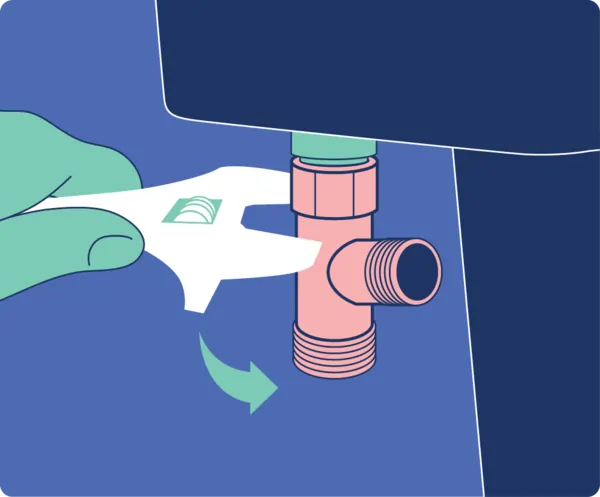
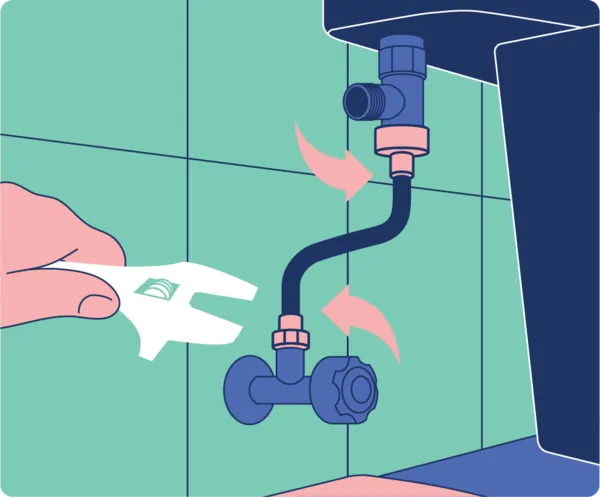
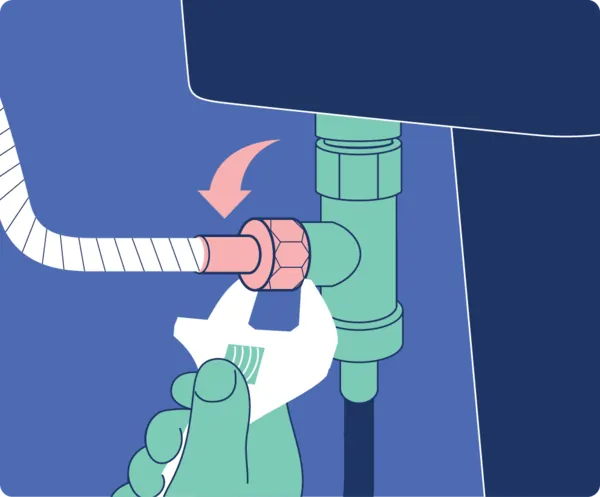
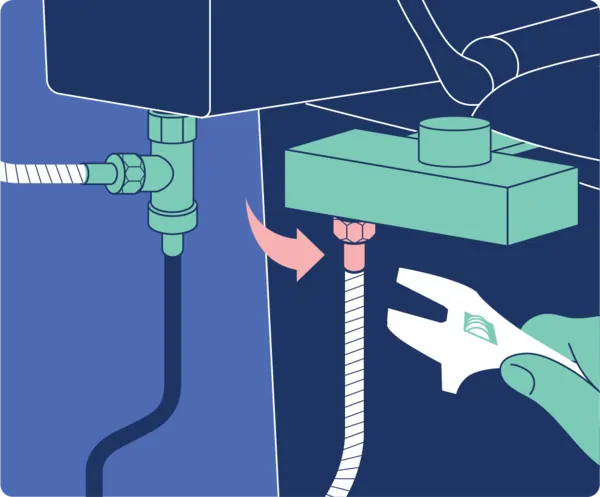
Step by Step Guide
We do not recommend installing a bidet without a Shut Off/Cistern Valve connected to the Wall Water Outlet. Please purchase a shut off/cistern valve for the water outlet in our accessories section.


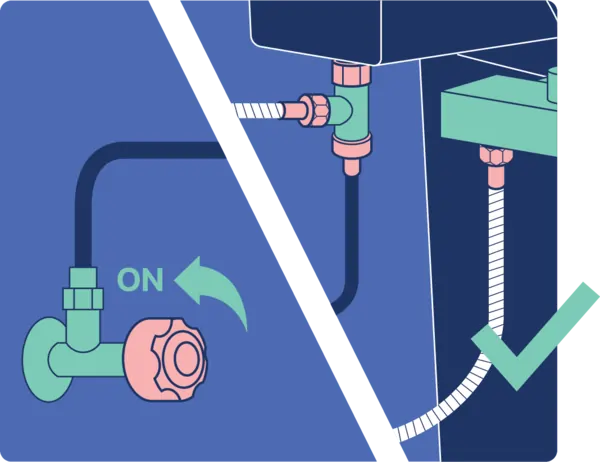
Testing the Water Connection
Recommendations for Daily Use and Longevity

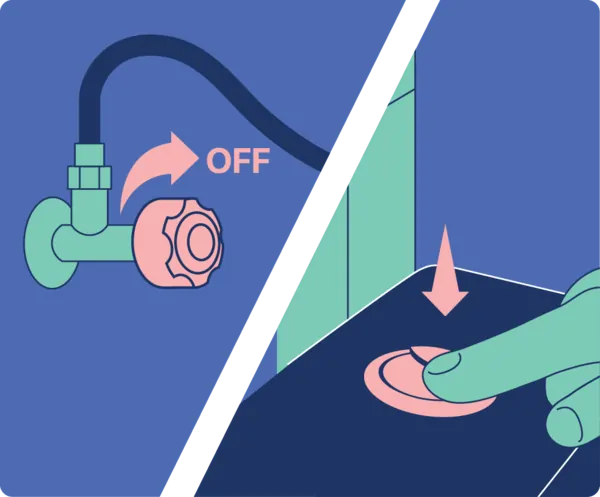
Turn off the T-adapter when not in use. Build up of water pressure into the spray can cause leaks and quicker deterioration of the bidet parts.

Use medium water pressure by not having the T-adapter turned up all the way. This will avoid water spills and accidents.

Keep it clean with general household bathroom cleaners.
Common Mistakes to Avoid When Installing a Bidet Seat Attachment
Even though installing a bidet seat is straightforward, there are a few common mistakes to watch out for:
- Overtightening the Bolts: One of the most frequent errors is overtightening the bolts when securing the bidet seat to the toilet. While it might seem like a good idea to ensure the seat is firmly in place, over-tightening can cause the toilet bowl or mounting hardware to crack. Tighten the bolts just enough to hold the seat securely without applying too much force.
- Not Turning Off the Water Supply Completely: Before you start the installation, ensure the water supply is fully turned off. Leaving the valve partially open can cause leaks when you disconnect the existing water supply hose. To avoid any flooding, turn the valve clockwise all the way until no water flows into the toilet tank.
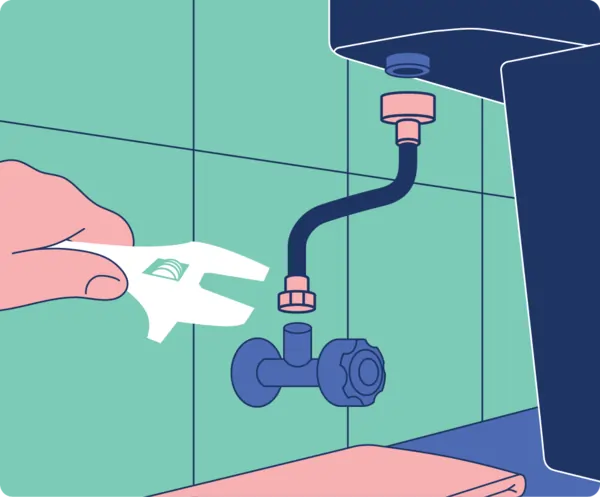
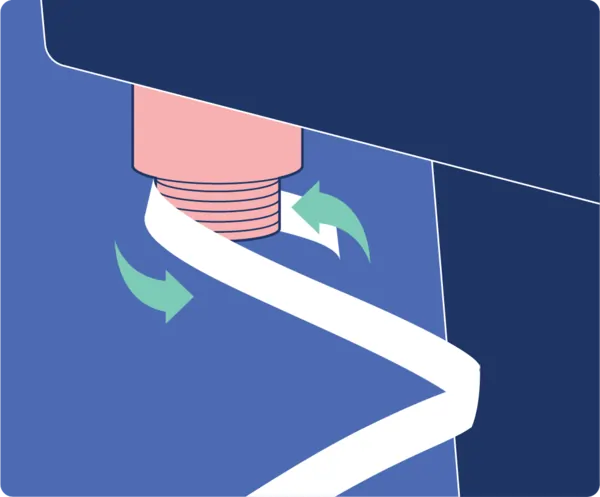
- Improper Hose Connections: During installation, make sure the water supply hose and bidet hose are properly connected to the T-valve. If not tightened correctly, leaks may occur at the water supply junction. Use plumber’s tape on the threads to ensure a secure connection and prevent leaks.
- Ignoring Water Pressure Settings:Some bidet seats come with adjustable water pressure. Failing to set this properly before testing the seat can lead to an uncomfortable spray or cause leaks if the pressure is too high. Make sure to check the user manual for the recommended water pressure settings.
How to Maintain and Clean Your Bidet Seat Attachment
Maintaining your bidet seat attachment is key to its longevity and proper function. Here are some maintenance and cleaning tips:
- Regular Cleaning: The bidet seat and nozzles should be cleaned regularly to prevent the buildup of bacteria, mineral deposits, or mildew. Use a soft cloth and mild, non-abrasive cleaners to wipe down the seat. Avoid harsh chemicals that could damage the plastic or electronic components. For the nozzle, many bidet seats have a self-cleaning feature, but manual cleaning once a month will keep it functioning optimally.
- Nozzle Inspection: Inspect the nozzle periodically to ensure it is clean and free of debris. If your bidet seat has a retractable nozzle, extend it for a thorough cleaning. For more stubborn buildup, you can soak the nozzle in a mixture of water and white vinegar for a few minutes, then gently scrub it with a soft brush.
- Hose and Valve Maintenance: Check the bidet hoses and valves every few months to ensure there are no signs of leaks or wear. If you notice any small leaks, try tightening the connections or replacing the hose. Additionally, inspect the T-valve to make sure it’s working properly and regulating water flow correctly.
- Electric Bidet Seats:If your bidet seat is electric, it’s important to keep it dry and avoid getting water into the electrical components. Unplug the unit before cleaning any part of the seat, and ensure that the GFCI outlet is functioning properly.
Benefits of Using a Bidet Seat Attachment Over Traditional Toilet Paper
A bidet seat attachment offers numerous benefits compared to using traditional toilet paper:
- Improved Hygiene: One of the biggest advantages of a bidet seat is its superior cleaning ability. Water cleans more effectively than toilet paper, removing bacteria and reducing the risk of irritation or infections. This makes bidets particularly beneficial for people with sensitive skin, hemorrhoids, or other medical conditions.
- Environmental Benefits: Bidet seat attachments dramatically reduce the need for toilet paper, which helps conserve trees and reduce waste. The production of toilet paper requires significant amounts of water and energy, so using a bidet is a more eco-friendly option. Over time, you’ll reduce your environmental footprint by cutting down on toilet paper consumption.
- Cost Savings: While there is an initial cost to purchasing and installing a bidet seat attachment, it quickly pays for itself by reducing the amount of toilet paper you need to buy. On average, a family of four can spend hundreds of dollars a year on toilet paper. With a bidet, those costs are significantly lowered, allowing you to save money in the long run.
- Comfort and Convenience:Bidet seats are designed to offer a more comfortable experience. Many models come with adjustable water pressure and temperature settings, making the cleansing process gentle and personalized. Additionally, features like heated seats, air dryers, and night lights add convenience to your bathroom routine.
Can You Use a Bidet Seat Attachment with Any Toilet?
While most bidet seat attachments are designed to fit standard two-piece toilets, there are some exceptions, and it's important to check compatibility before making a purchase. Here are a few factors to consider:
- Two-Piece vs. One-Piece Toilets: Bidet seat attachments are usually compatible with two-piece toilets, where the tank and the bowl are separate. However, if you have a one-piece toilet (where the tank and bowl are fused together), you’ll need to check if the bidet seat you’re purchasing fits this design. Some one-piece toilets have curved surfaces that can make mounting the bidet seat more difficult.
- Space Around the Toilet: Depending on the size and design of your bathroom, you should also consider the space around your toilet. Some bidet seats require extra space for the hose and water supply connections, so ensure there’s enough clearance on both sides of the toilet. The Bumwash Bidet Seat Attachments have controls on the right hand side.
- Plumbing Setup:Check the location of your water supply line before purchasing a bidet seat attachment. While most modern toilets have accessible water supply lines that work well with bidet seats, some older plumbing setups may require additional modifications or adapters.
Legal Requirements for Bidet Installation
While many of our customers successfully install their bidets themselves, it's important to be aware of the legal requirements surrounding bidet installation in Australia, the United Kingdom and the United States. We believe in providing you with all the necessary information to make an informed decision about your installation process.
Australian Plumbing Code Requirements
The Australian Plumbing Code specifies certain regulations for bidet installation:
- Bidets and bidet douches should be installed in accordance with Australia Standard AS3500 Section 10A.
- According to Section 10A.2.3 of the Plumber Guide, hand sprays (including those used as douche sprays) are classified as High Hazard and require appropriate additional backflow prevention, such as an RPZ valve.
- These products must be installed in compliance with The National Construction Code – Volume Three.
British Plumbing Regulations
In the United Kingdom, bidet installation is governed by the Water Supply (Water Fittings) Regulations 1999 and BS EN 1717:2000. Key points include:
- Bidets are classified as a Fluid Category 5 risk, the highest level of contamination risk.
- The regulations mandate a physical break between the water supply and the bidet outlet to prevent any possibility of backflow contamination.
- Professional installation by a qualified plumber is strongly recommended to ensure compliance with these regulations.
United States Plumbing Codes
In the United States, plumbing codes can vary by state and even by municipality. However, there are some general guidelines and regulations to be aware of:
- Most states follow either the International Plumbing Code (IPC) or the Uniform Plumbing Code (UPC), both of which address bidet installation.
- Bidets and bidet attachments must comply with ASME A112.18.1/CSA B125.1 standard for plumbing supply fittings.
- Backflow prevention is a key concern. The specific requirements can vary, but generally:
- Handheld sprayers must have a backflow preventer or vacuum breaker.
- Some jurisdictions may require an air gap or other specific types of backflow prevention devices.
- In many areas, while a licensed plumber is not legally required for bidet installation, it may be recommended, especially for more complex systems.
- Some local codes may require permits for bidet installation, particularly if it involves significant changes to the existing plumbing.
Professional Installation Considerations
While our products are designed for easy installation, it's important to note:
- In Australia, the plumbing code mandates that these products should be installed by a licensed plumber.
- In the UK, while not legally mandated, professional installation is strongly recommended due to the complexity of the regulations.
- In the US, requirements can vary by location. While DIY installation is often acceptable, professional installation ensures compliance with local codes.
- Similar considerations apply to other household products connected to water supply, such as washing machines, refrigerators with water connections, and water filters.
Customer Responsibility
We respect our customers' right to make informed decisions about their product installation:
- We provide comprehensive installation guides and support for those who choose to install the product themselves.
- However, we advise customers to be aware of and consider complying with local plumbing codes and regulations.
- The decision on how to proceed with installation ultimately rests with the customer.
Our Recommendation
To ensure compliance with regulations in Australia, the UK, the US, and for your peace of mind:
- Research your local plumbing codes and requirements before beginning installation.
- Consider consulting with a licensed plumber familiar with local regulations.
- If you choose professional installation, ensure your plumber is familiar with the specific requirements for bidet installation in your country and locality.
- In the UK, verify that the installer understands the Fluid Category 5 requirements and appropriate backflow prevention methods.
- In the US, check if your local jurisdiction requires any specific permits or inspections for bidet installation.
Remember, proper installation not only ensures compliance with local regulations but also helps maintain the warranty and optimal performance of your bidet.